
API keys
An API key gives your own systems access to the Shuttle API for one account: to take and refund payments, read your transactions and more. It is also the password for a Twilio or Telnyx Pay Connector. You manage your account’s keys in the Merchant Portal. For how a developer sends a key with each request, see Authentication for merchants.
Where to find your API keys
Section titled “Where to find your API keys”- Log in at merchant.shuttleglobal.com and open the account.
- Select Settings in the menu. The Edit Account page opens.
- Scroll to the API Keys section.
You need the Admin role to manage API keys: see Team management. API keys come with the paid plans. On other plans the section is marked UPGRADE and says API keys are available on the appropriate plan.
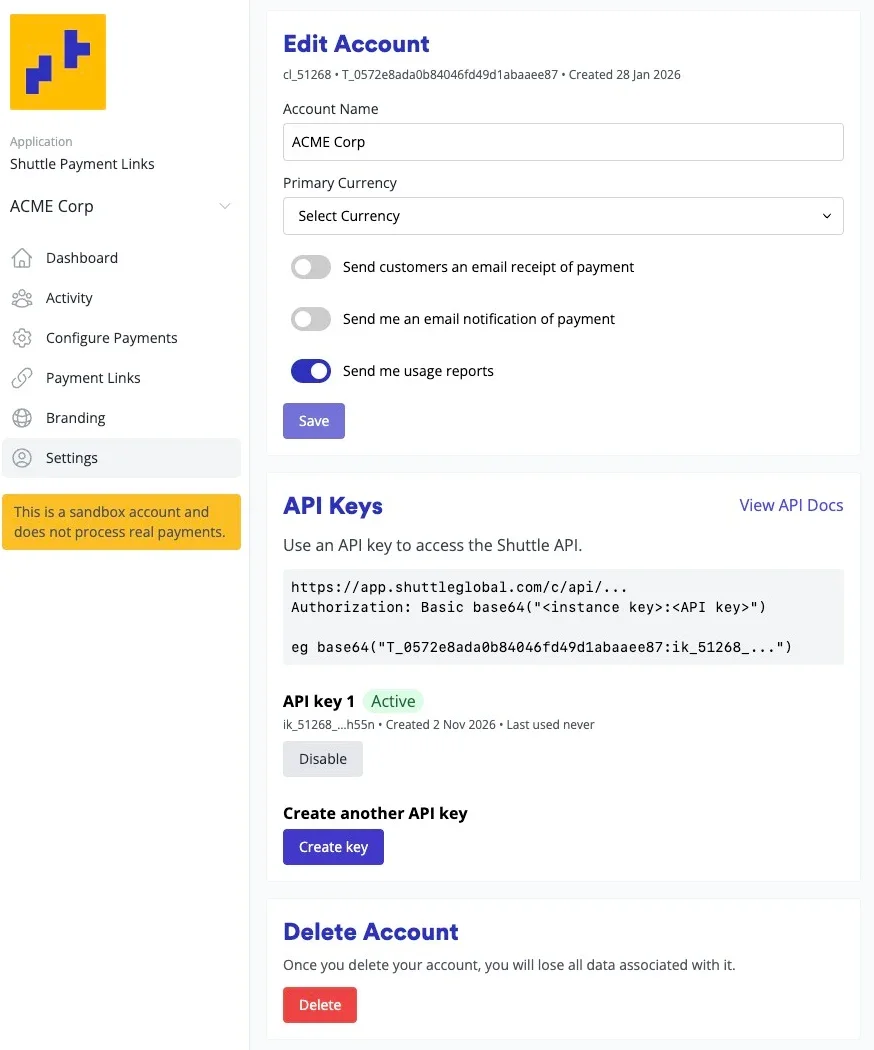
The top of the section shows how a request uses a key: the API address, and the Authorization header built from your account’s instance key and an API key, with your own instance key filled in as an example:
https://app.shuttleglobal.com/c/api/...Authorization: Basic base64("<instance key>:<API key>")View API Docs opens Authentication for merchants.
Create a key
Section titled “Create a key”- Under Create API key (or Create another API key if you already have one), select Create key.
- The Your new API key dialog shows the key. This is the only time it is shown, so select Copy and put it straight into your secret store (a secrets manager or your deployment’s encrypted environment variables), or paste it where it is needed, such as your Pay Connector’s password.
- Tick I have copied this key, then select Done, which stays greyed out until you tick. If you try to close the dialog without the tick, the Merchant Portal asks you to confirm, because the key can’t be shown again.
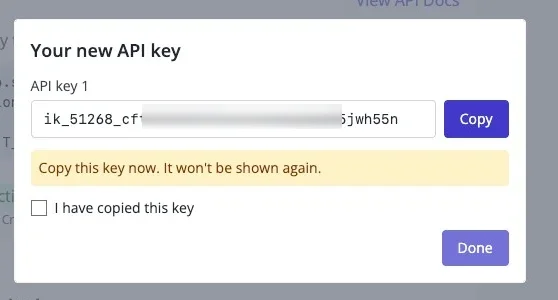
If you lose a key, it can’t be shown again: create a new one, switch to it, then delete the old one.
An account can have two API keys at a time. With two, Create key is replaced by a message saying to delete one to create another.
Keep keys on your server. Anyone with a key can take and refund payments on your account, so never put one in a browser, a mobile app or a code repository, and never send one by email or chat.
Your keys
Section titled “Your keys”Each key in the list shows:
- its name, API key 1 or API key 2
- its status: Active, or Disabled
- the start and end of the key, so you can tell your keys apart (for example
ik_51268_…h55n) - Created: when it was created
- Last used: when it last authenticated a request, or never. It is updated at most once an hour.
Disable, enable or delete a key
Section titled “Disable, enable or delete a key”- Disable appears on an active key. A disabled key stops working straight away.
- Enable appears on a disabled key and makes it work again.
- Delete appears on a disabled key only, so disable a key before you delete it. Confirm with Delete. A deleted key can’t be restored.
Rotate a key
Section titled “Rotate a key”Rotating means replacing a key with a new one without downtime:
- Create a second key.
- Switch every system that uses the old key to the new one, including any Twilio or Telnyx Pay Connector.
- When the old key’s Last used date stops changing, select Disable on it. If something still needed it, select Enable while you fix that system.
- Once nothing needs it, select Delete on the disabled key.
Rotate straight away if a key may have been exposed, for example committed to a code repository, written to a log, or pasted into a ticket, chat or email.
Twilio and Telnyx Pay Connectors
Section titled “Twilio and Telnyx Pay Connectors”A Pay Connector signs in to Shuttle with your account’s instance key as its username and an API key as its password. On accounts with Twilio Pay, the section says the key is also your Twilio Pay Connector password, and Twilio Pay Configuration links straight to it with Create an API key. Create the key there and paste it into the connector’s Password. See Twilio integration and Telnyx.
If you see “Upgrade required”
Section titled “If you see “Upgrade required””Your account may still have an old API key from before 1 November 2026, when API keys changed (it starts with sk_). While it still works, the API Keys section shows Upgrade required and asks you to change over to a new API key.
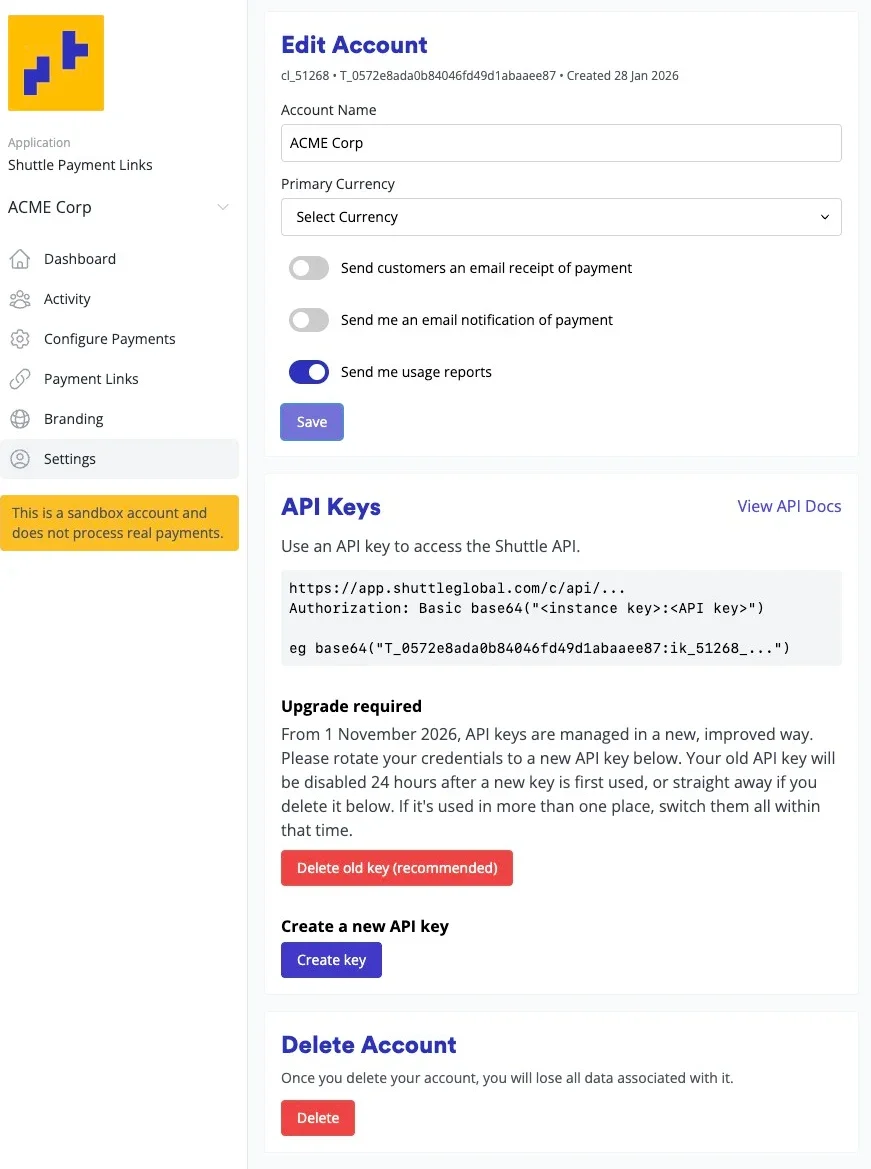
Creating a new API key starts the change-over: the old key stops working soon after the new key is first used, or straight away if you delete it. The exact rules are in Replacing an old secret key.
To change over:
- Create a new API key (see Create a key).
- Straight away, switch every place that uses the old key to the new one, including any Twilio or Telnyx Pay Connector.
- Select Delete old key (recommended), then Delete.
Once the old key stops working, the message goes.
Was this page helpful?
What went wrong?
Thanks for telling us.